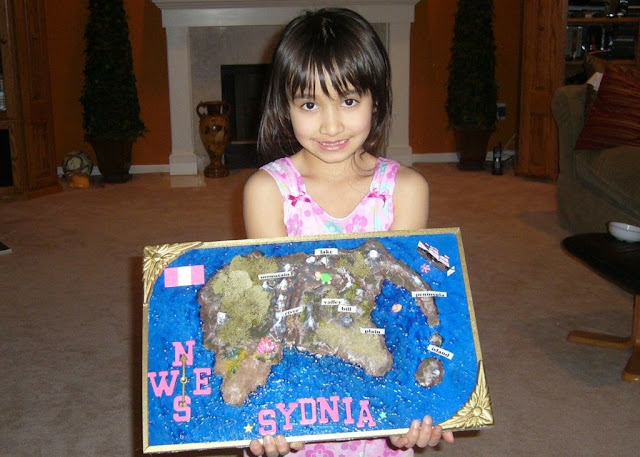
 We went to the craft store and bought some air dry clay and some wooden letter. This also proved to be an opportunity to experiment with some new water gels from Vallejo Paints that I had purchased for use with my Uncharted Seas Imperial fleet. I had plenty of other turf and terrain materials on hand. When we got home, I made Sydney sketch out on paper what her continent was going to look like and make sure it included everything from her requirements list. She named the continent Sydnia and even went as far as naming features after her stuffed animals and even giving it a capital.

 Next we went out to the garage and I had Sydney measure up some MDF board while I set up the table saw. We cut it to the maximum allowable size in her requirements list. After it was cut out, I had her check my work again.
 Next, she copied her re-drew her continent outline onto the MDF board where then she pressed the Crayola Air Dry Clay into the shape. Later she started to build up the features like the mountain ranges and the bed for the lake and river.
Taking a que from daddy, Sydney rummaged through some of her old games and came up with the arrow from a spinner and a castle from a Disney Princess Monopoly game. We thought this would make a good capital for Sydnia and pressed it into the clay where it made a good socket when it dried.

This took about a day or two to dry. When it did, it cracked and popped off the MDF board. Not too much of a setback as the cracks were pretty clean and the continent could be glued back together. Furthermore this allowed me to spray paint the board blue. I used a variety of different shades of blue paint, including some floral spray paint which proved to be somewhat transparent and some Testors metallic blue paint which provided the sparkles in the water. Overall I really like the looks of the water without even wanting to use the gel.

 I then glued the parts back together using a hot glue gun. Which I had accidently spilled a bunch of very hot glue out of a crack and it burned the skin off of one of my knuckles. I used the glue to fill in some of the cracks left in the parts that did't fit together well.
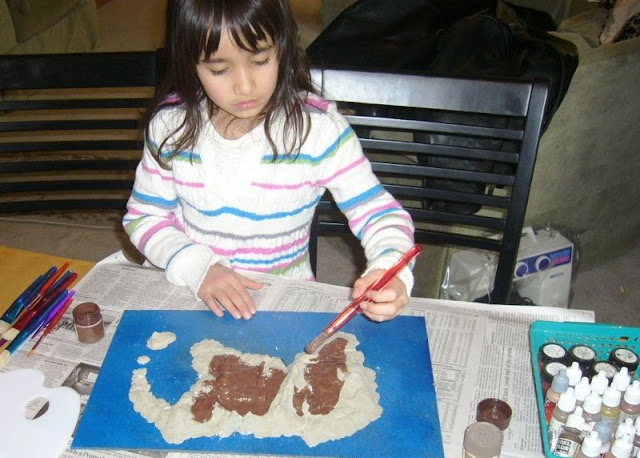
 Sydney then painted the land brown using some of my Tamiya acryllic paints. Next she went back to drybrushing with some highlighted colors I picked to help give it a more realistic look. We gradually added some beige and stone grey to the highlights and gradually added more white to it as she was just highlighting the mountain tops.
 After the painting was done, applied some thinned white glue and she added sand for the desert.
 While the glue for the desert was drying, I had her paint a sailing ship that came in the Jamestown Settlers Toob that we bought for her Pilgrim Cabin project the following year. Next she added some cactus to the desert, static grass to the plains and some dark green moss and lychen for the forests.
 Next Sydney worked on the lake and river beds with the Woodland Scenics Water Effects kit. So while she was painting the beds, I was finishing up on the sailing ship. Sydney added the finishing touches with the national colors of Sydnia....pink.


 Afterwards I mixed up the Vallejo Water Effects Gel. However I found the blue gel to be too opaque and mixed some of the clear gel into it. Probably about a 50/50 mix. The gel is very thick and you can use it to shape waves. It's wet and very light colored when wet but dries to a clear dark blue when it cures. After getting the hand of it, I showed Sydney how to apply it and she finished off the ocean. We made sure to get the gel up around the edges of the continent. This helped keep the clay secured to the board and provided a 'coastline' you could see through the gel. While the gel was still wet, we pressed the name of the capital and the compass rose into it, using it as glue. These were pre-cut wood shapes we got at Micheals and spray painted pink. The painted princess castle and sailing ship were then added. Sydney added some rocks and I then finished it off by pouring clear acryllic from the Woodland Scenics Water Effects kit into the lake and river.
This actually took several days for the gel to fully cure. During that time the clear acryllic in the lake and river reduced to about half their volume and I had to add more. During this time we made signs for the geographic features as part of the assignment's list of requirements.

I then took some thin scraps of wood and cut them to make a border. I found some neat wood detail pieces at Home Depot that would look good on the coners and painted them along with the spinner gold. Then hot glued these to the MDF board to make a border.

 For a finishing touch we added the national flag of Sydnia, which was made up of pink and white fields with a pink teddy bear paw print in the center. Sydney came up with the paw print using one of her ink stampers. Unfortunately the ink didn't show up very well.
We completed the project with a few days to spare. Sydney received an A+ for this assignment.
No comments:
Post a Comment